Monday, November 30, 2015

GPIO pins allocation under windows 10 IOT build on Raspberry PI

The Windows 10 IOT documentation https://ms-iot.github.io/
indicates that only the following pins are available 4,5,6,12,13,16,17,18,19,20,21,22,23,24,25,26,27 for GPIO.

If you wonder why so many pins are not usable as GPIO. This is because
  • GPIO 2, and 3 are reserved for I2C interface
  • GPIO 7,8,9,10,11 are reserved for SPIO interface
  • GPIO 14,15 are reserved for UART interface.


Note that 35 and 47 are also available but they drive LEDs soldered on the board and not pins on the GPIO connector.

If you are still using Windows10 IOT build 10.0.10240 you must know that for some unknown reasons the Raspberry PI GPIO pins 17, 19, 20, 21 are not usable. I think this is a very good reason to update to build 10.0.10556.


Program To list all the available GPIOs

 
I have developed a small program that list all the available GPIOs.
 
The XAML is the following
 

<Page
x:Class="CountGPIO.MainPage"
xmlns="http://schemas.microsoft.com/winfx/2006/xaml/presentation"
xmlns:x="http://schemas.microsoft.com/winfx/2006/xaml"
xmlns:local="using:CountGPIO"
xmlns:d="http://schemas.microsoft.com/expression/blend/2008"
xmlns:mc="http://schemas.openxmlformats.org/markup-compatibility/2006"
mc:Ignorable="d">
<Grid Background="{ThemeResource ApplicationPageBackgroundThemeBrush}">
<TextBlock x:Name="TextblockOutput" HorizontalAlignment="Center" VerticalAlignment="Center" />
</Grid>
</Page>


And the C# code associated
 

using System;
using Windows.Devices.Gpio;
using Windows.UI.Xaml.Controls;
namespace CountGPIO
{
  public sealed partial class MainPage : Page

  {
    private GpioController gpio;

    public MainPage()
    {
    this.InitializeComponent();

    gpio = GpioController.GetDefault();
    this.TextblockOutput.Text = "List of Supported GPIO pins:" +  Environment.NewLine;
    for (int port = 0; port < 64; port++)
     {
     try

      {
      gpio.OpenPin(port);
      this.TextblockOutput.Text += "GPIO Pin: " + port.ToString() + " is OK" + Environment.NewLine;

      }
     catch (Exception)

      { }
     }
    }
  }
}


Sunday, November 15, 2015

How to use a PC To Connect a Raspberry PI to a WIFI network


Introduction

 
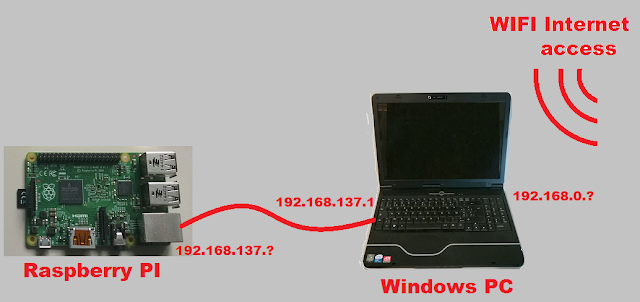
The problem is the following : I am using have a standard Raspberry PI (i.e. without any WIFI interface) at a location where the only way to access the Internet is the WIFI. Is it possible to use my portable PC running Windows as a router to connect the Raspberry PI to the Internet ?


The answer is YES and it is very easy


Step1: Activate ICS

Activate the ICS on the WIFI connection of the Windows computer. The ICS (Internet Connection Sharing) allows other computers to use the WIFI connection of the Windows computer.
This is done in the network control panel (you may reach it by using the command)
control ncpa.cpl
Then select properties on the WIFI network


And then activate the sharing of the the WIFI connection

Once this is done any computer connected to the PC ethernet port shall receive via DHCP an IP address in the 192.168.137.X network (note the PC is located at 192.168.137.1)


Step2 Connect the Raspberry PI to the PC


Connect the Raspberry PI with a standard Ethernet cable equipped with standard RJ45 connectors). You don't even need a crossed cable because the Raspberry PI support auto MDI-X (which means that the Raspberry PI will detect that a crossed cable is needed and automatically preform the « cross » internally) .
 
Now everything is done and your raspberry PI can access the Internet. But If You don't have keyboard and display connected to it you need to know which IP address the Windows PC DHCP has given to it.
 

Step 3 retrieve the Raspberry PI IP address

The simplest way to obtain this address is to query the ARP table. Start a Windows command prompt (if you don't know how to do it just press WINDOWS+R and type cmp ENTER)
and type the following command
arp -a -N 192.168.137.1
This will give you a reply that looks like that
 
In this list you see that the Rasberry PI has been granted the addres 192.168.137.55
 
Note : the 192,168,137,255, all the 224.x.x.x and the 239.255.255.250 addresses are all multicast addresses (we don't care about them)
You can now connect to you Rasberry PI via SSH and from the Raspberry PI communicate with the Internet.


Sunday, October 18, 2015

How to connect a PC to the Arduino Yun

Introduction


The Arduino Yun board is a relatively new member of the Arduino family.
 

It is similar to a Leonardo board ( i.e. An Arduino board with a Atmega32 processor) except that it has an additional processor (Atheros AR9331) running Linux (OpenWRT) , a microSD disk connector and many additional interfaces.


The Arduino Yun has many interfaces (not counting the usual Arduino connectors). There is a USB device micro type B connector, there is a USB host (Type A Connector). There is a wired Ethernet and there is also a possibility to connect via Wifi.
 

The USB Device Connector


This connector is the « standard » connector that we are used to see on every Arduino board except that it is a micro connector (like the one found on a smart phone) instead of a standard Type B connector.

As on an ordinary Arduino UNO you can use this connector to power the Arduino Yun board.
From the PC connected to the Yun board, this USB port appears as a standard COM port


As usual with Arduino boards, you may use this COM port to transfer a compiled sketch to the board and, a running sketch may use it to communicate using the well known serial class www.arduino.cc/en/Reference/Serial


The USB Host connector


This is a full size type A connector for connecting devices like USB keyboards, or mouse to the Yun. I have not yet experimented with it So I cannot say much about it. Just note that this port is connected to the Atheros AR9331 so it is controlled from LINUX. Which does not mean that the Atmega processor cannot acces it indirectly by going through the bridge that connects the 2 processors together.
 

The Wired Ethernet


Note: when using the Ethernet connection, don't forget to power your Yun board (if you don't use PoE) either via the USB micro connector or via the Vin pin (be careful with polarity an voltage).
Once the board is connected you need to know its IP address. The easiest way is to ask to your DHCP server/router the list of connected devices.
But you can also retrieve et IP address with this simple sketch (that you will have to upload via USB).
 

#include <Process.h>
void setup() {
// Initialize Bridge
Bridge.begin();
// Initialize Serial
Serial.begin(9600);
// Wait until a Serial Monitor is connected.
while (!Serial);
Process p; 
p.begin("ifconfig");
p.addParameter("-a"); // -a list all IP ports. Replace it by eth1 if you only
// want the wired Ethernet
p.run(); // Run the process and wait for its termination
while (p.available()>0) {
char c = p.read();
Serial.print(c);
}
Serial.flush();
}
void loop() {
//do nothing
}

The script result lista all the IP adresses used by the Yun board.


Note: Arduino Yun assigns the wired ethernet to eth1 and not eth0.


You can then connect to the Arduino Yun using any web browser


The password is « arduino »

An arduino sketch has no acces direct to the Ethernet port. To get acces to it You need to use the « bridge » object.


You may connect to the Linux terminal running on the Atheros AR9331 by using a ssh connection (on windows, the most popular ssh terminal is Putty (available on http://www.putty.org/)


The login is root and the default password is « arduino »

 
This gives you access to a surprisingly complete and powerful Linux computer.
It is possible to upload the sketch using the Wired Ethernet. To do that you need to install the « Bonjour » service and open the UDP port 5353 in your firewall. I have not tried it because I am happy with the USB transfer and I already have much too many services running on my PC.
 

 The Wifi

The Arduino YUN is by default a Wifi access point (i.e. a hotspot) This means that it creates a network on which you can connect your computer.
This is useful to reach the newly bought Yun board wifi but you will probably want to reconfigure it as a wireless adapter that connects to your Wifi network.
To do that connect your computer or any Wifi capable terminal (even a smartphone is ok) to the Yun Wifi network.

Use a browser to access the Yun board (it's address is 192.168.240.1)
The password is « arduino »
you can then configure the Wifi port so that it connects to your network

Once it is done the Wifi behave as the wired Ethernet (see explanation above)
Note : it is possible to turn off the Wifi. You may want to do that for security reasons. The code to execute to turn off the Wifi is quite complex. It is available is https://gist.github.com/sgk/6641198

Thursday, September 10, 2015

Creating A C# Desktop Program That Must Run With Administrator Privilege

The problem

Sometimes you want that your program requires to run with "administrator" privilege. For instance, if your program needs to listen to the TCP port 80.

This means that you would like to have this kind of message to appear at program start to request the user to grant the program elevated privilege.

The solution

It is possible to specify in Visual Studio to specify that an executable must be run with administrator privileges.

To do that you need to perform the 2 following steps:
  1. Add to the solution an "app.manifest" file

    The app.manifest is added to your solution
  2. Modify this file to set the correct value to requestedExectionLevel:
 

 <requestedExecutionLevel level="requireAdministrator" uiAccess="false" />


Note: When you try to debug such program inside the Visual studio environment, The visual studio shall detect that the administrator privileges are needed and request you to restart Visual studio in administrator mode.